I collect nativity sets. With so many on a shelf I sometimes need a little something to place behind a specific nativity set to help it to stand out. I love the Willow Tree Nativity Stars. They cost about $20. I knew I could make several sets of stars, just how I wanted them, for much less.
Tuesday, November 12, 2013
Willow Tree Nativity Stars Knock Off
Wednesday, October 9, 2013
Designing Furniture
When we moved earlier this year we found ourselves in need of some different furniture for a few bare spots in the house. I looked and looked and couldn't find what I loved for a price that was right.
Then on craigslist I saw an add for a guy that would build furniture for you. My husband and I went and checked it out. He ended up making three pieces for me. I gave him the basic wants and a drawing, he added a few things and now I have some furniture that works really well for our family. It was less expensive than buying ready made (but more then I usually spend on furniture).
I'm going to apologize now because my photographic skills are not the greatest and my camera is on the blitz- got to send it in for a repair.... I was squeezing up against walls trying to get the entire piece into the view finder- trying to adjust the colors to get close to the actual paint colors, etc. ..so sorry, but these photos will give you a general idea.. .
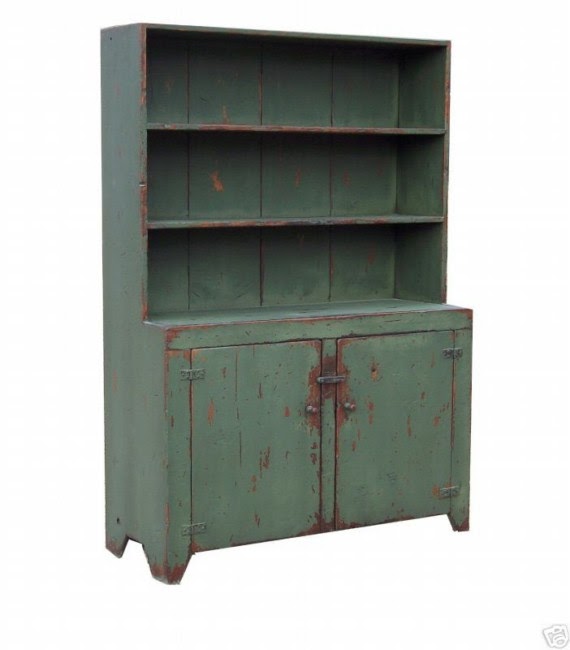
So, first up. The entryway shelf needed to be tall but not too deep so that it would fit near a window. This is what we came up with:
My version:
Finished product:
You can see our office from the front door entry. I needed something that was functional- that would hold two computers, printers, cords, etc. but I also needed a way to hide all of that clutter. This is the computerized version of my design:
I wanted some more storage in the office area. Not to decorate with but to actually hold books, etc. Here is my version:
I had the furniture maker paint it with Valspar's Fire Orange (from Lowes)- in real life it's a beautiful pumpkin/spicy orange and then I antiqued it. We are going to hang a large family picture on the wall above it- but getting that set up may take a bit (it's all a process, right?!). Oh yeah, and that wall color- not really gray- it's greige with taupe and a tiny bit of olive green mixed in- love how it looks in real life....
Here is what we came up with.
I'm grateful to have furniture. I'm grateful to have a place to put it. This has been a BLAST! I learned that designing something and the having it be created is really super FUN!
Wednesday, March 27, 2013
Painting the Town- Actually Just the House
We recently moved to a new town and to a new to us house. The paint colors were not quite what we would have picked so there has been lots of painting going on! I am color challenged and made frequent phone calls to my very talented Sister-in-law for direction. I learned a few things that I want to remember for the next time that we have to paint.
Paint chips don't work for me. I really need to see samples painted onto a large piece of poster board and tacked to the wall where I'll be painting. Valspar and Benjamin Moore paints have some of my favorite colors.
Under the direction of my decorator SIL I painted the back of the living room shelves a bright spicy orange. I tried two different kinds of paint there. The first kind: Behr Ultra went on thick and creamy- very nice.
The second kind- Valspar- ick. It was thin, runny and splattered and dripped everywhere. The color I picked for this spot was a Valspar paint and Home Depot's match wasn't quite right- that is why I ended up going with the Valspar. I also had to paint four coats of paint and that was over primer and a layer of the Behr.... so, in the future to save time I'll be using Behr paint when choosing between the two brands.
I also found the ONLY paintbrush that I can paint a straight line with. It is called Ziber and I get the two inch angled sash with the long handle- the short handled version had softer bristles which I didn't care for. This paintbrush is at Home Depot.
The previous home owners had a good tip if you want to upgrade your switch plates. They had painted them (and the screw tops) with Rust-Oleum Hammered paint and primer in one spray paint. It's an inexpensive way to jazz up the 25 cent white plastic outlet and plate covers. It gives them a rustic metal looking finish- I think there are six metal finishes to choose from.
We broke down and hired a painter to help us get things moving. It was pretty sweet to go about my daily routine and at the end of the day have two more rooms painted! Those are the tips I want to remember for the future... hopefully we won't be painting too much more for another ten years or so :)
Tuesday, January 24, 2012
Activity Day Temple Picture frame
My husband made me a picture frame- I love that he is willing and able to do projects like this!!!
I decided to make a few fabric flowers in grey and cream. Then I added an antiqued temple picture. Here is how it turned out.
I decided to do something similar for activity day (church girls group ages 8-11). I'll say up front this was not a very inexpensive project. I saw one version where the girls mod podge the temple pictures onto boards cut to size. You could do that here and then glue the flowers in the lower corner of the picture- that would save some money. Having fabric scraps and buttons on hand to use also helps.
To prepare I cut out circles from a cereal box (to glue the fabric to) and cut strips of fabric to make the flowers. I also painted the picture frames. The girls just had to make the flowers and glue them onto the frames. I also had several needles threaded and ready to use to gather the fabric for the large flowers. Even with all the prep work this class went about an hour and ten minutes. It would have gone faster if I would have had one glue gun per girl. I had six girls and three glue guns.
My daughter said that young people would prefer pictures that were not antiqued and distressed- so, we went with a standard 5x7 print of the temple. We also used this quote and talked about the importance of the temple. Whew, I'm ready for a nap!
Tuesday, May 24, 2011
Small Shelf Makeover
I found a dilapidated, battered shelf at the Salvation Army. Some of the hooks were broken off- really in quite bad shape and not the most attractive red color either (so sorry that I forgot to upload the picture from my camera before reformatting- sob- I really wanted to show it to you!). Just think broken, scratched up shelf without much of a ledge on top....try really hard to imagine it so you can be impressed when I show you the finished project ;o)
The empty squares could easily be filled with black and white family photos, illustrations, love notes, piano music, chalkboards, or maps- whatever you love- I found my free vintage seed packet clip art here.
Hurrah for makeovers!
I've linked up to:
Making the world cuter
Friday, April 8, 2011
Use Your Silhouette to make Tile Quote Displays
One of the easiest ways to use your Silhouette for home decorating or to make gifts is to make these quote tiles- Just purchase a tile you love at Lowes, Home Depot or Habitat Restore- then using your Silhouette software type your quote and cut your vinyl. Clean your tile with a quick swipe of rubbing alcohol and apply your quote- There you have it! A classy looking gift or an inspirational tile to place in your home.
Friday, April 1, 2011
Furniture Makeover Inspiring Blogs
If you're trying to decide about painting your furniture you might want to check out the following blogs:
Better After- even if you don't love the end style it is inspiring to see how much a coat of paint can change the look of a piece- and most of the makeovers I love anyway
Miss Mustard Seed- I've typed about her until I'm blue in the fingers- hah! LOVE her stuff.
Dreamy Whites- I don't believe she paints her own furniture- but the photography is so pretty and she illustrates just how delightful aged, chippy painted objects can be
Jennifer Rizzo- she if fairly new to me- she has a variety of ideas- including some great makeovers
Wednesday, March 30, 2011
Thrifted Metal Tray Makeover
I also added some dark brown wax to age it a bit. Now it has a home on the hutch.
Monday, March 28, 2011
Getting the Message- Chalk Paint on Magnetic Message Board
Here is how you make the magnetic boards:
Using homemade chalk paint- paint one or two coats of paint on the metal- no primer needed. Let dry.
Sand off any edges and areas that you want to show to "age" the piece.
Add a coat of clear wax covering the entire surface
Let that dry and then add a coat of dark brown wax.
Let that dry and then buff gently.
You can also make coordinating magnets. Just glue a magnet to any small object using E6000 glue. Let dry well. I used vintage buttons from my stash.
Now your message board is ready to go to work- it can be used for family messages, or for a rotating display of favorite quotes and scriptures, or to show off adorable family pictures, etc.
3/28/11 I've linked up with making the world cuter here
Friday, March 25, 2011
Recipe for chalk paint- great for painting furniture
Often when I'm antiquing I just add a top coat of a dark wood stain or glaze. Then wipe away the excess- leaving behind traces of brown. I tried using this staining technique on some wood that I had painted with chalk paint and the paint sucked it up the glaze so fast I couldn't wipe off the excess- I had to start over and repaint the piece!- So- make sure you use a layer of clear wax before adding the dark brown wax.
I was so excited about chalk paint I wanted to get more- but it is about $35 a quart- pricey.
So, I did what all good crafter/ thrifters do and I looked on the web for a recipe.... and I found one that worked!
I know these recipes say they are for chalkboard paint- but the paint looked really good on the metal I painted. These are the recipes I tested here. You do need to stir these mixtures very well. I painted some samples and the results looked very similar to the expensive chalk paint. This paint didn't store well- so just mix up what you need for the day.
To purchase my ingredients I went to habitat for humanity restore and bought Sherwin Williams latex paint for $1.50 a quart in some great colors! I also used keracolor-U unsanded grout with polymer from Lowes. The chalk paint is supposed to be thick (kind of like thick cake batter)- so if your recipe turns out too thin just add a bit more grout- if your recipe is too thick add some water.
Here are the steps for a nice finish:
Clean your wood
Paint with chalk paint
Cover with a clear wax
Antique with a dark wax
Buff and & enjoy
I wonder if I can make my own dark brown wax by mixing paint with clear minwax?
I wonder if I can use wood stain to antique a piece if I just use clear wax over the chalk paint first?
I wonder what would happen if I painted my bathroom cabinets in this duck egg color ?
3/2012- If your unsanded grout is lumpy you may even want to sift it before adding the other ingredients- this will eliminate white lumps and clumps in your finished project.
Tuesday, March 22, 2011
Great Furniture Thrift Store in San Antonio
While in San Antonio I was able to visit a few thrift stores. I was looking for a small piece of furniture to hold piano music books. While I didn't find just what I wanted I did find a few big pieces that I loved... having left my camera in the hotel room I will show you some similar furniture pictures from off of the web. You can buy this hutch on etsy.
The El Paso Import Company has some fun pieces- go there first if you need inspiration of what you can do with a hunk of wood and some chippy paint. And of course, there is inspiration all over web land- Picture below from centsational girl.
For a super duper paint tutorial check out miss mustard seed- she has a couple of different ones. Now you have the know how- go to the Old Door Store at 1710 Blanco, San Antonio, TX- look at their cool stuff, faint when you see the prices, scrape yourself off of the floor and then go next door to the unnamed furniture store (seriously I didn't see a name anywhere). If you don't find what you need ask the nice owner. He has another store you can check out. Solid wood dressers were $65 and I think he would be happy to negotiate prices with you. There was a huge entertainment hutch- that needed a little extra TLC for only $85.
I know some of you live in thrifters heaven and you can get amazing prices on furniture- even free stuff on Craigslist. I don't. Our salvation army and goodwill sell junky particle board (dinged and warped) shelves for more then you can buy them new at Target. So these prices are amazing for me and there are so many possibilities!!!
Thursday, November 4, 2010
Wreath hanger and Burlap Wreath
The wreath is made by taking 3 inch strips of dark brown burlap and bending forward and back while threading onto a metal hanger as shown here- takes five minutes if you really
11/9/10 Oops, forgot a step. After threading the burlap onto the hanger twist it- keep adding burlap until it has the fullness you are looking for.
11/8/10 Don't miss the other creative ideas at skip to my lou and making the world cuter.
Tuesday, November 2, 2010
Shutter & Pictures Decor- a copy
My daughter showed me this cute shutter makeover from How Sweet it Is and I decided it would be perfect for my new/up-do/ in process photo wall.
The shutters cost $2 at the Texas yard sale. I used WalMart's store brand, red spray paint. I simply sanded the shutters and added some walnut wood stain to antique them a bit more.
I followed the tutorial for clothes pins from Twice Remembered. Now I can have a rotating (if I keep up with it) photo display in my family room!
I decided to link up with Thrifty Decor Chick's Before & After party- so here is the before-the-TLC shutter photo-
Wednesday, September 22, 2010
My Version of the Fall Burlap Wreath
Wednesday, September 1, 2010
Free Halloween Cross stitch pattern- boo!
I didn't have any white or cream aida cloth on hand so I used this mushroom color- but white would have been better- then the border would have more of a corn candy look to it- but I'm not the fastest stitcher so this will have to do for this year. The free pattern is here. Happy Haunting!
9/5/10 Check out the cute Fall decorating ideas at This Blessed Nest- I've joined her linky party, too!