I'm having some computer issues and will be back as soon as we fix them or get a new computer :o)
Thanks!

Wednesday, October 26, 2011
Technical Difficulties

Friday, October 21, 2011
Crochet a Baby Hat

Alli shares the cutest baby hat with ear flaps. I'd want to do this in so many fun and fanciful colors!
I'd like to crochet this sweet little bear hat- I think I'd leave off the face and just make the basic hat with the fuzzy little ears... sweet!
I'm still loving these crazy adorable elf hats.
Now that the weather is finally cooling down a bit I'm in the mood to sit and watch old movies and so I'm looking for projects I can do while I watch. I'm liking the old reruns on netflix too- currently I've been watching the Dick Van Dyke show. Silly fun.
Wednesday, October 19, 2011
Making Interchangeable Headbands
I'm getting a huge stash of headbands, flowers and bows and thought I'd better come up with a way to simplify. I decided to make some interchangeable headbands. I went to dollar tree and bought a variety of headbands- thin, thick, different colors, etc.
Then I went home and cut a tiny piece of bias tape- I simply folded the bias tape ends under and sewed it onto the side of the thick headbands- making a loop- like this.


Monday, October 17, 2011
Adorable Halloween Clip Art
I found the CUTEST Halloween clip art today. It costs a dollar and you can download several graphics... all of them SUPER adorable. Check this out. Look up all the Halloween clip art by Kristi W designs. Please don't try to swipe the files from my blog- this is too sweet a deal to miss!

Tuesday, October 11, 2011
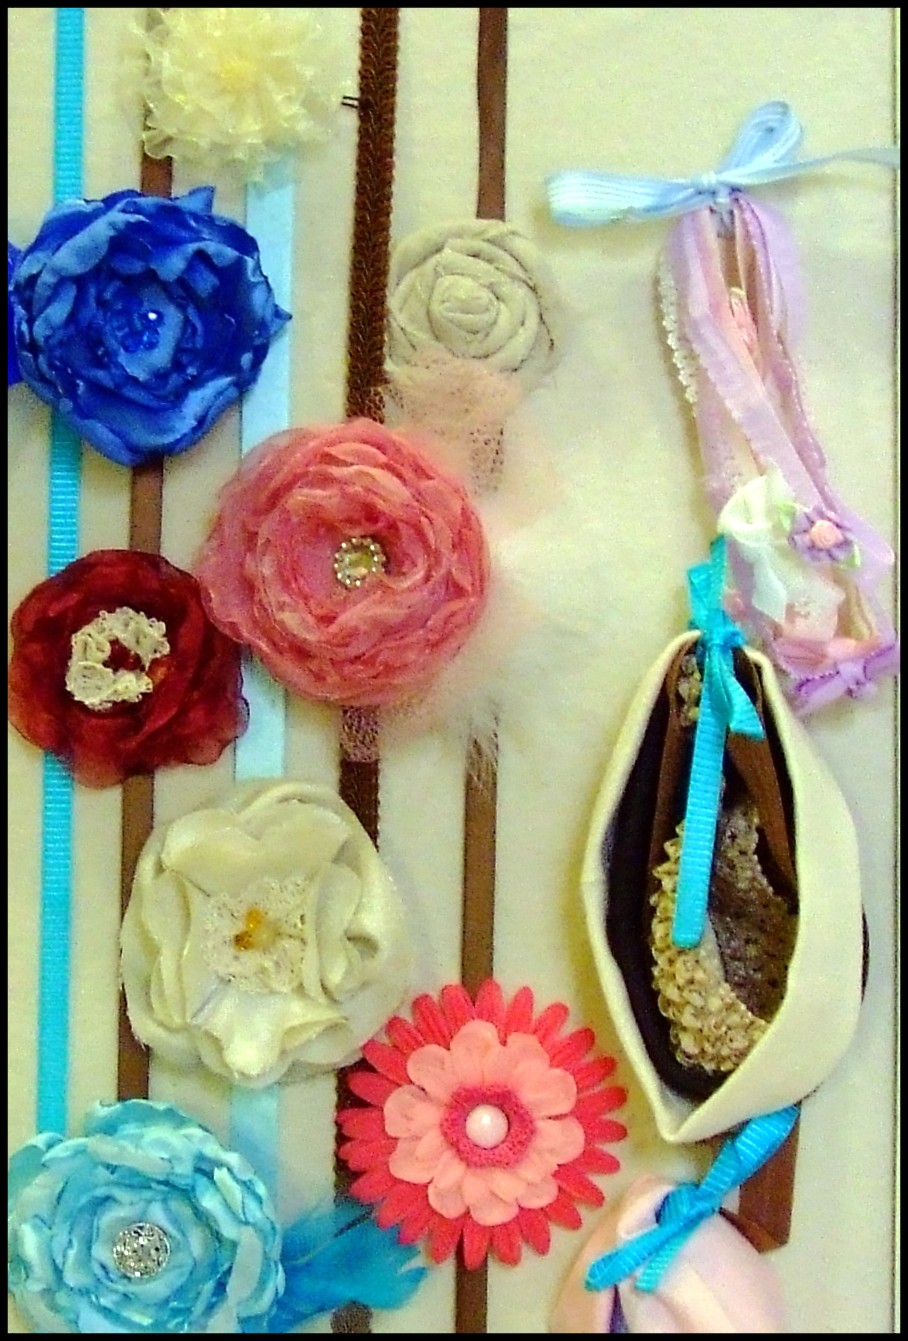
How to Make a Bow Holder from a Picture Frame
I'm not the first to do this- not by a long shot. However, I was so excited about how it turned out that I wanted to share it. I've been gathering up some accessories to use in my Not-really-photo-shoot-shoots-because-I'm-not-good-enough-yet picture taking sessions and they were turning into a jumbled mess.


Friday, October 7, 2011
Activity Day: Dream Box
For activity day we had a few projects to finish up. One thing we did was to decorate notes to send to the girls that haven't been attending primary (children's church group).
Then we used the remainder of our time to decorate these little white boxes that I got at Michaels on clearance for 29 cents. The girls raided my sticker stash and used markers to decorate their dream boxes. I gave each of the girls a picture of the temple to put in their box. They can put in other treasures and little notes of their goals and dreams. They seemed to have fun.
Here are a few pictures that I snapped while they were working on their dream boxes...


Wednesday, October 5, 2011
Halloween Knock and Run Treat Box

Normally you put together your own plate of treats before heading out to do the "happy haunting" but I thought I'd put together a little knock and run kit for a loved one. If you want to put one together here are some ideas for the fillers:
- cute paper plates
- holiday ink stamps and stickers
- tags
- ribbon
- sugar cookie mix
- frosting with decorator tip
- holiday sprinkles
- cookie cutter
- colorful instructions on how to knock and run
Now you can make a kit for friend! Or if you have little ones like I do gather up a few of the items listed above and have the kids help to make some treats- then head out to so some mysterious, top secret, deliveries--- don't get caught!
Monday, October 3, 2011
Free Holiday Mini Banner Cutting File for Silhouette

- 6 1/2 feet of embroidery floss
- five different sheets of scrapbook paper in a holiday or color coordinating theme. Target has packages of paper in their dollar section
- Silhouette machine or a ruler and exacto knife
- double sided tape

Place your cute paper blank side up and apply a piece of double sided tape.

Drape sweet banner across picture frames, windows, mirrors, Halloween trees, etc. Then make one for each of your favorite holidays.
10/10/11 I linked up to Making the World Cuter
Subscribe to:
Posts (Atom)